|
| Connector in place except for the lift out |
Tuesday, December 31, 2013
The Connector
Bruce dropped by last night and we had a very productive time. I had laid out switches from the old layout and some pieces of flextrack to gives us an idea of the track flow and especially density in the Irwin Yard. Bruce had drawn that section of the benchwork 18" deep and I decided to build it 20" for a little breathing room ... and we can use it!
Once of the things we decided was that the connector benchwork really needed to be completed so we can plan the curved transitions from left and right as well as the placement of the cross over on the lift out section to maximize the tails on either side allowing some operation if the lift out is removed. After Bruce left, I pulled out the compound mitre saw and got to work. Not too bad!
Sunday, December 29, 2013

Saturday, December 28, 2013
Dad's Coming To Town
My father and my sister are coming to visit today, along with Cathy's kids. This is the first time my Dad will see the house since we bought it last year and I spent a very, very productive day in the train room wrapping up the benchwork so I could show off the train room.
I glued the last piece of insulation to the benchwork and I decided to temporarily put up the front fascia to make it look a little more finished. Again, I reused pieces from the last layout so there are holes cut where a Digitrax plug connector would be placed and since I have not even considered how the wiring will be completed, the holes are completely random.
I did a thorough cleaning of the room, moving all the remaining scraps under the benchwork. There is still a lot of leftovers that I will eventually discard once I am sure I have no need for the item. As I straightened up, I began to think once I have the layout pretty far along, I can remove one of the larger storage drawers, the tub of DCC wires and controls will be on the layout and the racks and stacks of the rolling stock kits will be as well.
Can't wait.
 | |
| What a sight! |
 |
| Eventually, an 8" wide, double track connector will span the gap at this end of the layout |
I did a thorough cleaning of the room, moving all the remaining scraps under the benchwork. There is still a lot of leftovers that I will eventually discard once I am sure I have no need for the item. As I straightened up, I began to think once I have the layout pretty far along, I can remove one of the larger storage drawers, the tub of DCC wires and controls will be on the layout and the racks and stacks of the rolling stock kits will be as well.
Can't wait.
Friday, December 27, 2013
A "duh" moment
Yesterday I installed the second 8 foot section of insulation across the back of the layout. This piece covers part of the peninsula and part of the final section along the left hand wall. I had just barely enough Liquid Nails adhesive to finish the peninsula. Just...barely. I left it to dry overnight.
This morning I went down and checked everything over. Looking pretty good. I just need to run to Lowe's and get one more tube of Liquid Nails ... then I looked up to the shelf that runs around the layout where some paints, ballast and ground cover are stored. Not one, not two but THREE tubes of Liquid Nails.
Duh.
Sunday, December 22, 2013
Solved!
The peninsula was really bothering me. How could it be flat on the ground and cantiwamus when I put it up? I burned a few brain cells, as well as a 6 pack and I realized that maybe if I did not set it on the support running around the walls, I could compensate for the tilt. An hour later, and some help from my twin boys, and I had the darn thing mount and nearly perfect!
I had picked up some insulation for the subroadbed today...which is now green instead of the pink I used a couple of years ago. Actually that is better because the pink was annoying on the old layout since I never did finish the scenery. I still have two pieces of plywood to cut, and two others to glue down before I can attach the subroadbed but this is fantastic. Bruce and I might be able to transfer the trackplan during the holiday break from work!
 |
| Peninsula finally level |
 |
| Added the corner trim to show how it will look finished |
Saturday, December 21, 2013
Yes!....er, No
Laid the peninsula on the ground and it was pretty flat so I glued and screwed the top while kneeling on it hoping the extra weight (and yeah, there's some extra weight!) would keep it flat and square. Next I trimmed the piece to fit between the left and right corner pieces and under the electrical outlet and with Adam's help put it in place.
If you zoom in you'll notice that the front and rear levels are darn near perfect. You'll have to trust me that its level from front to back, and it is. But...wait...what are those gaps of light under the orange level. DARN! This will take some thinking.
 |
| Mostly level |
Saturday, December 14, 2013
Framing with a twist
Tackled that remaining wall today. This section would be 8' 4" from the corner but since there is already a 24" wide module, I only needed to build a 6' 4" by 20" wide section. As I've mentioned, the disadvantage in this room is using it as a workshop AND building the railroad in the same place. Means I have to move everything several times but as I use up my surplus supplies, there is less under (over and on) the layout that has to be moved.
The section along the wall went very smoothly. The peninsula ... well, that's another story. If you look carefully at the photo you see the end seems to twist from the upper left to the lower right. Well, it does. I tried to keep the module exactly square as I built it but something went wrong. Big time. According to the level it's within tolerance ... barely. I am not so sure. Will see if I can get Bruce to come over and offer his opinion. At least I cleared out enough space he can come into the train room!
 |
| Irwin Yard to the left, Herminie Mine on the peninsula |
Monday, November 25, 2013
It starts with a plan
Now that I have a solid track plan, I started mounting the modules from the old layout to the wall. I will be able to reuse at least four of the 2' x 4' modules. I started in the corner farthest from the interior door and worked along the outside wall, setting the modules on the support board Bruce and I put up a couple weekends ago and added cantilevered braces so there will be no leg supports to kick ... a nuisance I found with the last layout. Using one of the old legs for a temporary brace, I was able to quickly mount the 3 modules. Nice!
Look at all that under layout storage with no legs in the front to get in the way. As I told Bruce, the more I build, the less I have stored in the train room which makes every step enjoyable. On the down side, a 10' x 10' train room is small with all the working materials and dragging in the power mitre saw and workmate work bench to cut the braces. Small price to pay for this awesome room.
 |
| Cantilevered braces hold up the benchwork |
Sunday, November 24, 2013
Brilliant
I spent some time in the train room last night with the last plan from Bruce and it's just brilliant. There are 2 continuous loops with the hidden track so tracks can run during an open house, or background while I show new operators the routes.Plenty of yard tracks in both the East and West yards, with the mainline and runaround track right through the center - very prototypical. There are 3 separate towns for switching - Irwin, Herminie and East McKeesport (from left to right) and the 2 track hidden staging on the left allows 1 east and 1 west bound offline trains to come onto the layout and later Irwin build trains can head out to those hidden tracks.
Today, I am mounting a couple of the modules to the wall and test placing some switches. With some work I may have most of the benchwork and sub roadbed in by the end of the year ... maybe even some of the mainline down?
Now it's getting exciting!
Today, I am mounting a couple of the modules to the wall and test placing some switches. With some work I may have most of the benchwork and sub roadbed in by the end of the year ... maybe even some of the mainline down?
Now it's getting exciting!
Saturday, November 23, 2013
Getting Close
While I have been scraping dried Liquid Nails off the tops of the plywood benchwork (one of the down sides to reusing the modules from the last layout), Bruce has been busy doodling over the ideas we discussed last time he was over. There are a few givens:
The next list is the desires:
- 24" deep benchwork with 18" on one side for my modeling desk
- 4' peninsula for WCC Mine No. 4 in Herminie, PA
- Irwin yard has to be either on the left or right shelf
- Removable/duckunder at the entrance
 |
| Bruce's latest brainstorm |
- Primarily for operations where trains are made up and broken down in Irwin yard and at least 2 switching areas - E. McKeesport and Herminie
- Mainline offers a continuous run to break in engines, simulate trains coming from off the layout, and maybe show for an open house
- Outside track for a "mole" yardmaster to make up trains and put them in a 2 track hidden staging yard for east/west arrivals and departures
Earlier today, Bruce sent me the sketch above. Now this has some possibilities. I may have to get the turnouts back out, do some test fitting and even mock operation.
Sunday, November 10, 2013
Beginning Benchwork
Bruce stopped over yesterday and we talked for a long time over the mockup I had laid out on the modular benchwork. We agreed that what I had laid out very closely resembled his last track plan but there were details in the yard area that needed some rethinking to fit in the 10' span with curves at either end - yard interchange, yard lead, cabin car track and ideally 4 tracks each 1 car longer than my longest train. Then we started talking about the passing sidings and figured pretty much 5-6 cars in a train plus engine and cabin car. Good compromise I feel so that the train does not wrap from one town to the next but still enough to make switching a little demanding.
Bruce had a number of interesting ideas and took some of the sketches for thinking and doodling. It will be very interesting to see what he comes up with and I can hardly wait. While he was here, he helped me mount the bracket around the room that the back of the modules will rest on. In reality it took me longer to pull out and move back all the stuff under the layout than it did for us to mount the three 10' spans of 1" x 4" but it was definitely a 2 man job and I appreciated his help.
I took the picture of Bruce after we leveled and screwed the board at both ends. He was drilling pilot holes for the rest of the span. I have another photo, I will have to dig up and post, of him doing almost exactly the same time waaaaaaaaaaayyyyyyy back when we were both lieutenants in the Air Force and building a shelf layout in my apartment. Hmmm..... maybe this time we will actually be able to run a train!
Bruce had a number of interesting ideas and took some of the sketches for thinking and doodling. It will be very interesting to see what he comes up with and I can hardly wait. While he was here, he helped me mount the bracket around the room that the back of the modules will rest on. In reality it took me longer to pull out and move back all the stuff under the layout than it did for us to mount the three 10' spans of 1" x 4" but it was definitely a 2 man job and I appreciated his help.
 |
| Bruce screwing the board to the wall studs ... we hope! |
Thursday, November 7, 2013
Mockup
One of the advantages of rebuilding instead of starting from scratch is having enough track, buildings and cars to mockup some ideas. Sure, I have to scrap glue off the old bemchwork tops and I am sure the turnouts and tracks will be a little tricky as I reuse them but look at what I mocked up last night.
I realized the most challenging arrangement will be the Irwin yard. How big is enough and can I fit it. I laid out some track last night and think I have a workable plan. This arrangement is close to the Idea Plan yesterday and not too different from Bruce's plan as he has pointed out.
Looking north, the right side of the yard area has, from front to back, an engine track, RIP and MoW tracks and a double-ended cabin car track - some thing that was missing from the old layout.
The left side has the 4 track yard. As you can see, the 4th track has space for 7 cars which should be pretty good but I need to confirm the interchange track with the yard, the yard lead and the rest of the layout can support 6-7 car trains with an engine and cabin car. Mostly I expect 4-6 car trains for the traffic flow.
 |
| Looking west, closest track goes to staging, middle is the mainline and the inside track is the yard lead |
Looking north, the right side of the yard area has, from front to back, an engine track, RIP and MoW tracks and a double-ended cabin car track - some thing that was missing from the old layout.
 |
| Engine, RIP, MoW and Cabin car tracks form the right side of the yard |
 |
| Four track staging yard |
Tuesday, November 5, 2013
Idea Plan No. 1
A couple of weeks ago I took the family to the Cincinnati Div 7 show and picked up several items, including the PRR Facilities Book Vol. 10 which covers the PRR route through Irwin and surrounding areas, the center of my layout desires! Last weekend, Bruce and I went to the Dayton Div 3 train show which is always great and I got a pack of Virginian & Ohio (V&O) switchlists that Al McClelland signed for me. What a treat! Al's writing about the V&O operations - and works by Tony Koester, John Armstrong, and Bruce Chubb - are why I love to "run trains".
With those two events as inspiration, and finally getting the benchwork temporarily set up for generating ideas on what is and is not feasible, I began doodling. Below is the first "idea plan". Sort of to scale (I used a scale template) I tried to fit in all my druthers.
Yes too much track, but you have to start somewhere. The curves are 24" but I am willing to go a small as 20". I would like 5-6 car trains plus engine and cabin car (it is 1958 after all) and a 4 track yard in Irwin to sort the inbound traffic. This is the left side of the drawing with a 2 track staging yard that will be hidden behind industry flats. The 3 track Herminie mine is on the peninsula and the right side of the plan is East McKeesport with more industries for switching. Two to three operators - Irwin Yard, Hermnie & East McKeesport, and the "mole" operator outside the track at the top of the drawing.
A start - just needs some ideas and I know exactly who to ask!
With those two events as inspiration, and finally getting the benchwork temporarily set up for generating ideas on what is and is not feasible, I began doodling. Below is the first "idea plan". Sort of to scale (I used a scale template) I tried to fit in all my druthers.
 |
| Idea Plan #1 |
A start - just needs some ideas and I know exactly who to ask!
Saturday, September 28, 2013
Ramping Up
It's been a busy summer with a lot of travel for work and nice weekends to take our new travel trailer out. I've been thinking about the railroad and what exactly I want to do. First was to decide on the height of the benchwork. I needed to lower it from the previous layout to clear the outlets on the 3 walls, so a couple weeks ago I cut all the legs down 3" from 48" to 45".
Also, I really wanted to reuse as many of the modules from the previous layout. I started moving them around a little and hit on a brilliant idea today. I took the two modules that used to be the East and West staging yards and placed them over my modeling workbench. These modules are only 18" deep instead of my standard 24".
After placing these two and a corner 24" deep module, I still have one remaining 24" x 48" module that I used as a peninsula. In the photo below, taken from the doorway into the garage (the door to the backyard is to the far right of the picture), you can see the peninsula and the rest of the layout. Imagine a connector track across the open space and that's the layout - 10' x 10'.
Now I can place some switches and noodle on a few track plan ideas. Maybe ... possibly... have trains running by Christmas?
 |
| Cutting the legs to 45" in the back yard |
 |
| Benchwork over my desk is only 18" deep. |
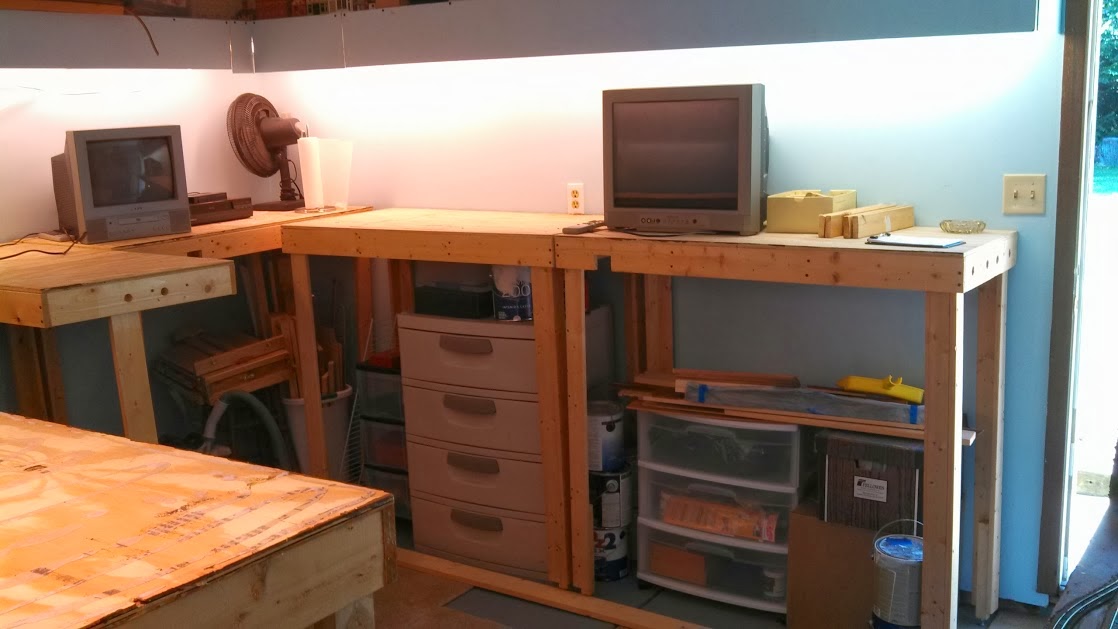 |
| Outside wall, 24" deep by 10' |
Tuesday, March 5, 2013
In between
I always seem to get bogged down when I am in between projects on the layout ... or in this case, the absence of a layout! I still have not picked the final design although I am pretty sure it will basically be the last design Bruce created. I don't think there is anything else we can do for MORE space for the benchwork - without going to multi-level which is out - so the next step is to build the benchwork and test laying some track. The two things holding me back from this plan are the small-ish online yard and whether or not there will be enough space for scenery and buildings ... things I cannot really envision until I see the placement in 3 dimensions.
In the meantime, Nicholas, Adam and I have been fixing up the N-scale layout. I ordered some Micro Trains parts - #1000 Bettendorf Trucks w/Couplers and Micro Trains Line, #1015 Couplers - Assembled - so the loco and all the cars have the same coupler. Nicholas and I sculpted the mountain area and we started to assembly the furniture factory. All things to keep me busy while I figure out next steps on the HO layout.
I did get some "motivation" in the mail yesterday with the N-scale couplers - City Classics, Railroad Street Company House 3-Pack and 10 pieces of code 100 flextrack and rail joiners for when I am ready to lay some track.
Maybe by the next post, I'll have some benchwork and track set up ... or at least a row of company houses!
Tuesday, February 26, 2013
My First NMRA Contest
Last month, I took a couple of flat cars to the local NMRA meeting and entered them in the open loads contest. This is the first time I ever entered a model in a contest and amazingly, one of them earned 2nd place. Not bad considering they had 34 entries which was apparently a record showing. Here is the page from the Call Board newsletter announcing the winners.
 |
| PRR 98502 Flatcar with load |
 |
| 2nd Place, Kit |
Wednesday, January 23, 2013
In the meantime...
I am been working on a couple little things while Bruce and I finalize the trackplan for the new PRR layout. Over the last couple weeks I was able to stop in T & K Hobby in Bridgeport OH, Hobbyland here in Dayton and found a new store in Annapolis MD while I was there on business. Only grabbed a few small things but very much enjoyed browsing.
Next, I finished cataloging my books and some of the key articles from my magazine collection. So when I am ready to paint figures, weather freight cars, or build a PRR depot I know exactly where to find the steps or plans.
Finally, although its a bit chilly in the train room, I have been doing some work on the boys N-scale layout. Mostly I want to finish something for a change. Nicholas is a little more interested in trains than Adam but occasionally I can get both of them involve. We plaster coasted the extruded foam hillside and tonight Nicholas and I painted it an earth tone. Tomorrow we'll try placing a couple of rock castings and maybe plant some grass. Then we can complete some of the buildings and lay the road through the town.
Not sure if I am quite ready to tackle pouring the water!
 |
| Nicholas painting the hillside |
Subscribe to:
Comments (Atom)